
Using a twist lock for your Clover Convertible Bag
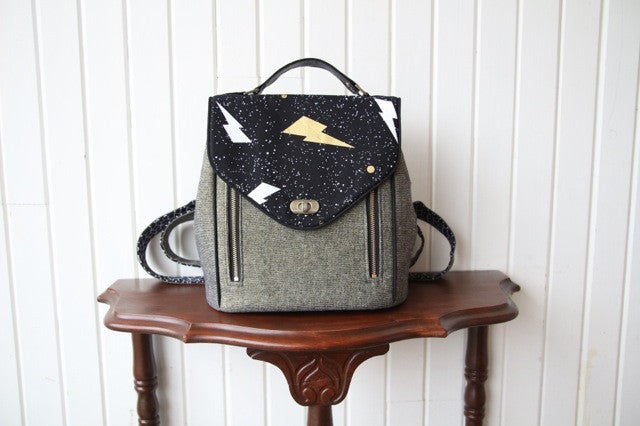
My very first pattern as part of the Bag of the Month Club has just been released - The Clover Convertible bag. The Clover is a medium-sized bag that converts from a backpack to a cross body bag with a quick change in strap position. It has a larger compartment at the top and a smaller train case compartment at the bottom.

In the pattern instructions, the default flap closure is a thumb lock however this tutorial will explain the steps to install a turn lock closure instead. For this bag, I do not recommend a magnetic snap closure of any kind because when your bag is full and you lift it by the handle you don't want the magnet to let go from the weight of the bag when filled.
Before we begin:
Before starting, you will need to log into your member's account on the Bag of the Month Club website and download the pattern. Print out the pattern as instructed and prepare your pattern pieces.
Please note: I am using the small turn lock with screws from Emmalinebags.com for this tutorial. You will need to make adjustments as necessary depending on what type of lock you are using and how big it is.
STEP 1:
You will need to modify 2 pattern pieces: FLAP A and MAIN PANEL D.

On MAIN PANEL D, you will mark the the twist lock location by making a mark at the centre 1.25" (3 cm) up from the top edge of the thumb plate oval.

For FLAP A, you will do the same and mark the location of your twist lock at the bottom centre of the flap, 1.25" (3 cm) from the bottom edge. Punch out a hole at the location of this mark and transfer it to the RS of your FLAP A Exterior piece.
STEP 2: 
Once you have completed step 33, take the back plate of your lock and centre the middle opening over the mark you made in step 1. Draw all the way around the larger centre opening and the location of the 2 screw holes on either side.
STEP 3:
If you have a hole punch the same shape as your lock, punch out the hole in the centre. You will also need to use a hole punch or awl to punch out the 2 screw holes. Apply fray check to the holes to prevent your fabric from fraying.
STEP 4:
Place the front plate of your lock WS facing up, then place your flap over top, also WS facing up. Make sure your holes align with the holes on the front plate. Trim more fabric if necessary.
STEP 5:
Place your back plate over top, add a drop of glue inside each screw hole and insert screws to secure your lock in place.
STEP 6:


When you get to step 55 of the pattern, mark the location of your twist lock male part following the NEW mark you made in step 1 above on both the WS and RS of your front assembled MAIN PANEL. Fuse your fleece in that new location.
STEP 7:
Skip steps 57-59 from the pattern. 
Place the centre hole of your lock's washer over the mark you made and then transfer the location of your lock's prongs to the RS of your assembled front MAIN PANEL.
STEP 8:
Cut out the prong holes and apply fray check. IMPORTANT: Make sure you are not cutting through your zip pocket lining pieces!
Flip your MAIN PANEL D so it is WS up, push aside your zip pocket lining pieces again. Push your turn lock's prongs through the holes you cut, place a scrap of Peltex and then your washer. Push your prongs down to secure.
Continue at step 60 to complete your bag.