
Hey everyone! It's me, Wendy from WD Handbags, again! Are you ready for another pattern Mash Up? This time we're going to take the Snapdragon Satchel and make it a convertible backpack with the help of the Clover Convertible Bag. It's super easy too! Sound good? Awesome! Let's get started!
First off you need to cut out the straps and strap connectors per the Clover pattern. Now, one thing to keep in mind with the strap connectors is that if you do them in vinyl and construct them per the pattern instructions they might be too thick for your machine since you'll eventually be sewing 8 layers of vinyl plus the fabrics and interfacings. I did them in vinyl to try it out and it was tricky but do-able.. If your machine struggles with layers I would suggest cutting them in half the width indicated in the pattern, then make your long edges meet in the middle and top stitch the edges to hold them in place. That way you're only at half the layers. Make sense? Awesome.
Next you'll want to cut out all of the Snapdragon pieces except for the cross body strap since we'll be using Clover's straps.
We're going to assemble the straps and the strap connectors per the instructions in the Clover pattern. Then we will begin the exterior assembly of the Snapdragon starting just after the strap assembly instructions on page 3. Follow the instructions until you get to page 8 and come back here.. we need to change things up a little bit.
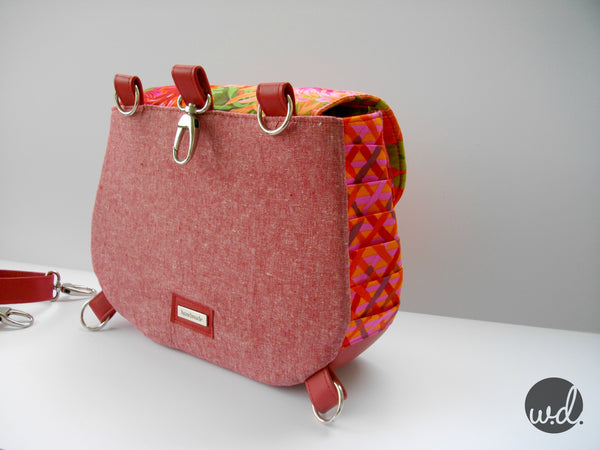
How is it looking so far? Fantastic! I can't wait to see it! We're on page 8 of the instructions and it says to sew both body panels to the gusset - but before we attach the back one we need to attach our bottom connector tabs. I marked my tabs to be 5" from the centre of the body. We'll baste those in place with a 1/8" seam allowance.
As you can see in the picture below, I also have my top flap constructed and the connectors clipped in place. The ones with the rings are 1/2" from the side and the one with the clip is in centred in the middle of the flap. You can also baste these with a 1/8" seam allowance on the right side of your flap.
*Edited to add: In the original Snapdragon pattern instructions, you would attach your cross body strap to the sides of the bag centering it at the top of the pleated portion of the gusset (complete instructions on page 10); if you prefer you can add the two ring tabs to that gusset portion of the bag instead of on the flap. 
Now sew your back body piece with basted rings to the gusset.
Next you're going to attach your magnet and sew the top flap to the body of the bag per the pattern instructions.
Sidenote: you can see in the image below that the bottom connector tabs stick out straight - that's one of the issues with the thickness of the vinyl. If that's something that you don't like the look of you can easily sew the tab down or use a rivet to hold it flat against the back of the bag. It will also be something to consider with the connector tabs at the top of the bag.

Now you will continue the assembly per the pattern instructions, once your bag is completed, simply attach the Clover straps to the back and voila! You have a backpack or a cross body bag - depending on what suits you at the time!


Back pack

Cross body
Thanks for joining me! Hope you love your new Snapdragon/Clover Mash up!
-Wendy xo