
The Dogwood Travel Duffel pattern has just been released and if you love the style and shape of the bag but don't need a large size, you can create a smaller version by following this tutorial.
Before starting, you must purchase the Dogwood Travel Duffel pattern. You must also download the Mini Dogwood PDF tutorial which includes a cutting chart.
The final dimensions of the Mini Dogwood Duffel are: 11.75” W x 9” H x 6.25” D
Step 1 - Printing your pattern pieces:

Print out all pattern pieces at 70% scale in your printer settings. You will NOT need the following pieces: Zipper Cargo Pocket E, Side Gusset Top G. Use the cutting chart provided at the end of this tutorial and cut out all of your pieces as instructed. You will need to modify the magnetic snap location on Pocket Flap A and Cargo Pocket B so there is only one centre snap mark on both pieces. The mark should be at the same distance from the top edge of each pattern piece as the current marks.
Step 2 - Supply list:
Gather your supplies. You will not use the same Notions and Supplies list as the large size. Instead you will need the following:
(1) 12” zipper (main closure)(1) 10” zipper (front exterior zipper pocket)
(1) 8” zipper (interior zipper pocket)
(1) 14mm magnetic snap
(2) 1” swivel clasps (with wider opening)
(1) 1” rectangle slide
(2) 14mm grommets (1/2” inner diameter or larger)***
(4) purse feet (optional)
58” L pre-made piping (or make your own)
*** Please note that similar to the large size, you can substitute the grommets for D-ring connectors. Please follow instructions in large size pattern.
Please note that you will also need less fabric than the large size.
Step 3 - Interfacing:
Once you’ve cut all your pieces according to the cutting chart, fuse your interfacing as instructed in the pattern with a few exceptions:
1. You will have less pieces to interface overall since you are omitting the pieces mentioned in Step .
2. Fuse the fleece to the WS of your Bottom lining piece.
3. When interfacing the BOTTOM exterior, you will not be using foam and since you are installing only 4 purse feet, the placement will change as illustrated below.
Since we aren’t using foam, make sure to protect your bag’s lining from the metal prongs on your purse feet by fusing a scrap of interfacing over top of the prongs.

Step 4 - Assembly:
Follow all of the assembly instructions with the following changes (noted in order of assembly):
- Your adjustable strap will be 1” wide instead of 1.5” wide.
- Your front cargo pocket and flap will only have one centre magnetic snap instead of 2. View of Pocket Flap A lining and Cargo Pocket B exterior with one centre magnetic snap:

- At step 28, use 1/4” seam allowance to sew your flap pieces RST.
- Skip steps 34-37 for vinyl pocket
- Skip steps 46-51 for suitcase straps
- Skip steps 53-62 for side zipper cargo pocket assembly
- At step 63, you will be sewing your Side Gusset Lining J exterior pieces to the bottom (instead of the zipper cargo pockets)

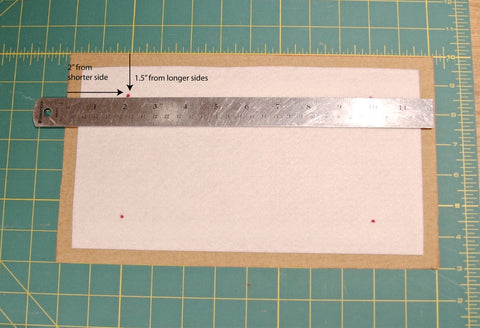
At Step 71, your zipper pocket placement and rectangle measurements need to change as follows:
- rectangle dimensions change to 8” W x 3/8” H
- zipper pocket should be placed 2” from top edge of Main Panel lining piece
- Skip steps 85-91 for top handles
COMPLETE REMAINING STEPS AS INSTRUCTED.