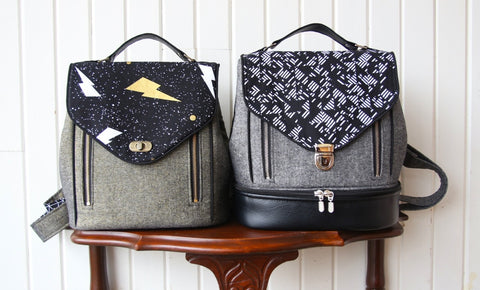
My very first pattern as part of the Bag of the Month Club has just been released - The Clover Convertible bag. The Clover is a medium-sized bag that converts from a backpack to a cross body bag with a quick change in strap position. It has a larger compartment at the top and a smaller train case compartment at the bottom.
If you feel that the train case is not quite something you'd like to tackle just yet, I have written a tutorial that explains how to make the bag without the train case and still have a fabulous looking bag. By following this tutorial, your bag will have a final height of 10 inches (25.4 cm) instead of 10.5 inches H (26.7 cm).
Before starting, you will need to log into your member's account on the Bag of the Month Club website and download the pattern. Print out the pattern as instructed and prepare your pattern pieces.
STEP 1:
We will need to adjust the length of 3 pattern pieces:

For MAIN PANEL D, SIDE PANEL B and BACK BOTTOM PANEL (not pictured), you will need to extend all of these three pattern pieces by 2 inches at the bottom.
STEP 2:
Cut out your pieces according to the pattern instructions however DO NOT cut the following:
- BOTTOM C - do not cut 2 lining and 2 fusible interfacing
- BOTTOM C Firm interfacing - do not cut 2 Peltex and 1 Fusible fleece
- Train Case Back Panel E
- Train Case Back Panel Interfacing
- Train Case Panel F
- Train Case Top Lining Band
- Train Case Binding
You will want to change the following:
- BOTTOM C - cut one foam interfacing
- an additional 8" of piping for a total of 62 inches
- zip pocket lining pieces should be 9" W x 9.5" H (not 9" W x 7.5" H)
Under Notions and Supplies, you will NOT need the 24" double pull zipper.
STEP 3:
Complete all steps up to and including step 68 on page 18. 
When you begin to assemble your MAIN PANELS and SIDE PANELS, start with the back panel (with the flap) and attach both SIDE PANELS to the longer edges.
STEP 4:
Take your remaining 2 D-rings and D-ring straps. Slip the strap through the D-ring, fold the strap into a loop with raw edges butting and flatten the loop with the D-ring at the top.
STEP 5:
Pin or glue the straps 3/4" from the bottom edge, just on the inside of the piping on the back panel. Sew in place through all the layers with a box shaped stitching for both straps.
STEP 6: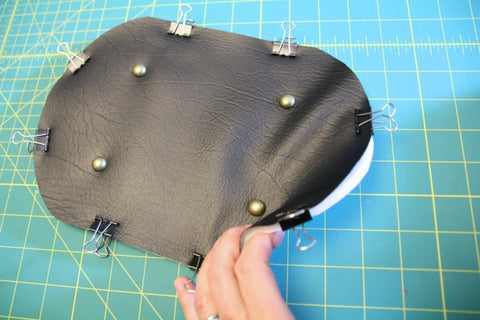
Go to steps 125 and 126 on page 27 and prepare the BOTTOM C Exterior of your bag. Once you've installed the purse feet do not complete any other steps in that section. Instead, take the foam interfacing piece you cut in STEP 2 above and clip it to the WS of your BOTTOM Exterior piece. Then baste stitch in place with a zig zag stitch. Since we don't have the sturdiness of the train case bottom, the foam will make the bottom more structured.
STEP 7:
Complete step 87 to mark the centres on BOTH the lining tube and the exterior tube in the same way. Complete step 88 to mark the BOTTOM C Exterior and Lining pieces in the same way. Attach the lining tube to your BOTTOM C Lining piece just as explained in steps 88-89 HOWEVER, use a 1/2" to 5/8" seam allowance so your lining fits into your exterior shell nicely. 
Repeat steps 88-89 and attach BOTTOM C Exterior to the Exterior shell. Trim seam allowance.
Turn your exterior shell RS out. It should look as pictured above.
STEP 8:
Make sure your zippered pocket is wide open.
Ignore the instructions in step 122 and place your Exterior shell RS facing out inside your Lining shell WS facing out (so they are RST) and clip along the top edge making sure the 4 side seams are perfectly aligned. Sew all the way around the top of your bag then trim seam allowances.
STEP 9:
Turn your bag RS out through the opening at the bottom of your interior zip pocket. Take your time and it will come through. Sew the bottom of your zip pocket closed. Press and topstitch the top edge of your bag, attach your strap and you are done!
One of my testers, Sheri of Munkee Made, made this Clover without the train case exactly as described in this tutorial except that she added 4 inches (10 cm) to the height so she could fit a water bottle and her Macbook. She also made this gorgeous bag entirely in cork!