Hello everyone! I recently released my very first pattern as part of the Bag of the Month Club - the Clover Convertible bag. The Clover has a train case compartment on the bottom that requires a double pull zipper.


On the left, I have used a metal zipper and on the right, a nylon coil zipper. Both options are fine but if you prefer the look of the metal zipper, they can be difficult to find in a double pull option. I decided to attempt converting a 2 way metal jacket zipper into a double pull zipper and found it surprisingly easy!
You will need:
(1) 2 way metal jacket zipper at least 26" long (66 cm)
(1) additional zipper pull to match one of the pull on the 2 way zipper
Fray check
Wire snips or pliers (jewelry pliers work best)
STEP 1:

A typical 2-way jacket zipper looks as pictured above. It has 2 pulls, usually in 2 different styles and they open from the ends. We want to change this to a double pull zipper. To do this you’ll want to select a zipper that is at least 2 inches longer than your project requires. For the Clover bag, we need a 24” double zipper for the train case so I’ve purchased a 28” zipper. I’ve also purchased an additional zipper pull that matches one of the zipper pulls on the 2-way zipper.
NOTE: Sometimes it is impossible to find additional pulls in which case you will need to purchase a second jacket zipper with the same kind of pulls. You can buy a zipper of ANY size (smaller to keep costs down!) as long as the pulls are identical.
STEP 2:
One end of your zipper will have typical zipper stops but the other end will have larger bar shaped metal stops as pictured above. This is the end we will modify. One of the stops will have a hook at the top. I am pointing at this hook in the photo above. This is the stop we want to remove.
STEP 3:
Using an old pair of heavy duty scissors, carefully cut off this metal stop. My zipper tape had a plastic coating that prevents fraying but if yours does not, apply some fray check to the zipper tape.
STEP 4:
Take your extra zipper pull and slide it on the side with the remaining zipper stop first, making sure it is pointing down (pull should be pointing outwards). Insert the zipper tape into the pull until the stop and 1 or 2 teeth are inside the pull. Then slide the other end of the zipper tape (where we cut the stop) into the other side of the pull.
STEP 5: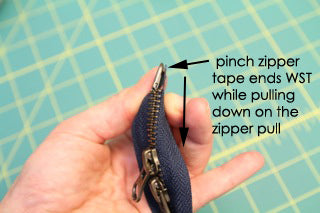
Pinch the tops of your zipper tape WST above the zipper pull and then pull down on the zipper pull to engage it and get both sizes of the zipper tape inside. This can take a bit of wiggling to make sure your teeth are aligned properly. If it’s not working, take the pull off and try again - your zipper teeth may not have aligned properly.
STEP 6: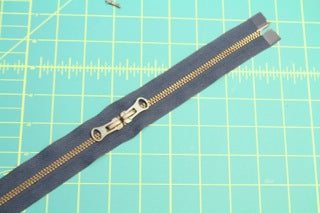

If you need to shorten the tape (or if you are making the Clover bag you’ll need to shorten it to 24”), mark the total length of zipper needed. Then make a second mark 1/2” away going outwards towards the end of your tape. You will need to remove the zipper teeth in this area. Start by opening the end of your zipper up to the inside mark you made.
STEP 7:
To make removing zipper teeth easier, you’ll need a pair of wire snips as pictured above. You can sometimes use any type of pliers but I find these cut through the metal teeth easily and don’t damage your zipper tape. These are commonly used to make jewelry.
STEP 8:
I find removing teeth easier if done from the zipper’s WS. Turn it WS facing up and fold the zipper tape so one of the teeth is sticking up a bit.
STEP 9:
Squeeze the tooth from the top and bottom to squish it. Then clip it in the centre and most of the time, it will fall off with a small amount of tugging. Continue until you have removed all the teeth from that 1/2” space past your inside marks.
STEP 10: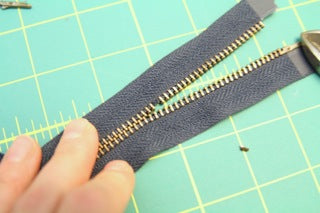
Make sure to apply Fray Check to the areas of your zipper tape where you have removed teeth so it does not unravel.
Download a PDF of this tutorial