

Lotus Handbag Sew Along DAY 3
Welcome Back!! Today we will be assembling pockets! Side Pockets, interior pockets, and zipper pockets!!
We will start with the side pockets.
Take an INTERIOR BAND E and place it with the shorter angle on the top, right side up on your table. Match the top short angle with the right side of INTERIOR BAND MIDDLE D like so:

Sew the shorter edges together, then repeat for the other side - sewing the shorter angle edges together. Repeat for the other INTERIOR BAND E and INTERIOR BAND MIDDLE D pieces. Press the seam allowances open AND press in half like so:

Now set those aside for just a minute.
Take your SIDE POCKET F pieces and we will sew our darts - simply fold at the centre of the dart (fabric right side together) and stitch at 1/4" seam allowance using the dart lines as a guideline:

Repeat for all eight darts.
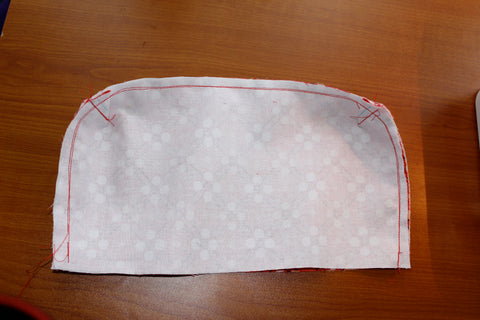
Take two of your side pocket pieces and match them up right sides together, making sure the darts line up (I simply push one to one side, the other opposite like so)

Sew all around the pocket leaving the top edge open. Repeat for the other side pocket. I like to double stitch ALL my pockets and interiors.
Press side seams open. Our next step is to attach the top of our pockets. I start at the side crease we made when pressing the top band, lining up those side creases with the side seams of the pocket, right sides together. Ease the top of the pocket around the bottom of the band, and clip/pin then sew in place.

NOTE - it's okay if the side seams don't match up perfectly, but make sure you catch those pockets when sewing.

Trim the seam allowance (those corners!)

Press the seam allowance towards the pocket. Topstitch along the pocket edge:

Flip the pockets inside out again. We will now find our centers of the side pockets for our magnetic snap placement. I do this by flattening out the pockets on my mat and finding the center (of both sides), mark them on the top band.

Magnetic snaps - the "male" side has the pokey outie part and is not magnetic (ie it will not be attracted to your sewing machine plate as the female side is), so we will want to attach the male side on the shorter side of the pocket. Mark 1.5" from the top.
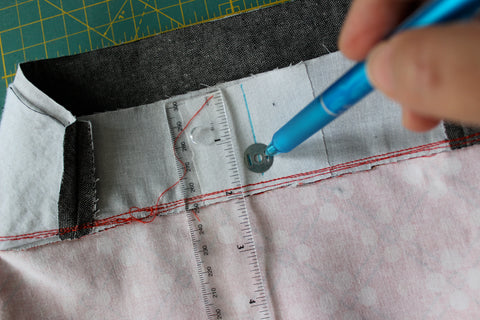
Using the washer as a guide - mark on either side of the center. Use your seam ripper to slice two small slits, just big enough for your magnet ends.

apply a drop of fray check!

then slip your MALE magnet part through the slits

I like to back my magnets with a bit of Peltex or Stiff Stuff or even a bit of fleece before putting on the washer, then bend the prongs open:

Then I cover it with masking tape! You could also iron a piece of woven/fleece interfacing over it to protect the lining from the prongs.

I then very carefully line up the male magnetic side to the other side of the pocket, mark where the female should be and put her in the same way I did the male part. Repeat all steps for the other side pocket.

Side pockets DONE!!
It's INTERIOR pocket time! Gather your LINING G pieces, slip pocket piece(s), zip pocket piece(s) and your 8" zipper (my zipper is longer than 8", I'll just trim it):

Instead of two pieces 10" x 6" for the slip pocket, I cut one piece 10" x 2" and another 10" x 10" and sewed them together along the 10" side I did this because I like to use up all the fabric I can and it just makes things a bit more interesting for the interior of the purse. I then folded it right sides together so it is now a rectangle approx 10" x 6". Sew all around the edge, leaving a 3" gap for turning, trim the corners:

Turn it right side out, poke the corners out with a chopstick, tuck in the side where the turning gap was, press well and topstitch along the top edge.

Now center your slip pocket onto one of your LINING G pieces so the bottom edge is 2.5" above the bottom edge of LINING G. Pin in place and mark a line down the center with disappearing ink or chalk.
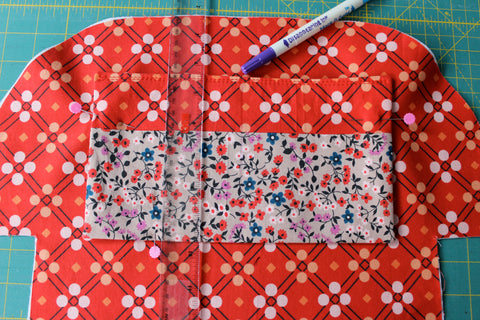
Starting at the top right corner, secure the seam by backstitching, sew down the side of the pocket, pivot, sew to the center mark, pivot and go straight up to the top of the pocket, pivot and go all the way back down until you reach the bottom of the pocket, then stitch along the bottom and back up the left side.
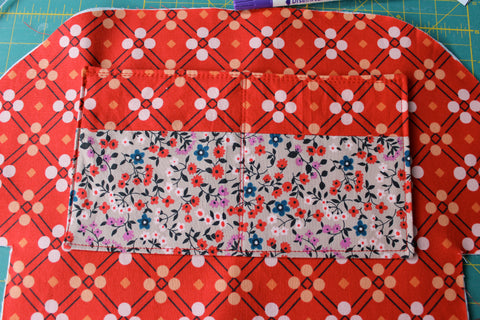
it will look like this when complete:
Now set that lining piece aside and grab your other LINING G piece, 8" zipper and zip pocket piece(s).
I do my zip pockets differently than Celine, choose whichever you are more comfortable with, they both give the same results :)
Flip your LINING G so the backside is facing up, find the centre and draw a line 1.75" from the top edge and 4" each way from the centre (your line will be 8" wide centred on your lining), I then proceed to mark two more lines 1/8" below the first and make a box. Draw triangles on either end. It should look like this:

I then flip my lining piece over and place the pocket piece on top, making sure there is an 1" of pocket piece above the drawn box. I forgot to take a photo of this step but it will look just like the pattern's photo but won't have the box on the pocket piece. Except I use a piece of scotch tape on either side instead of pins.
Sew the exterior of your box, using a small stitch length.
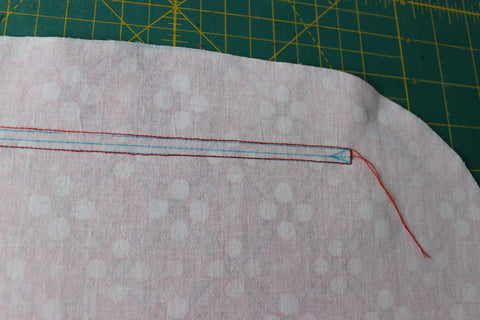
Now carefully cut along the middle line and your triangles, getting as close to the stitched corners as possible without cutting through them
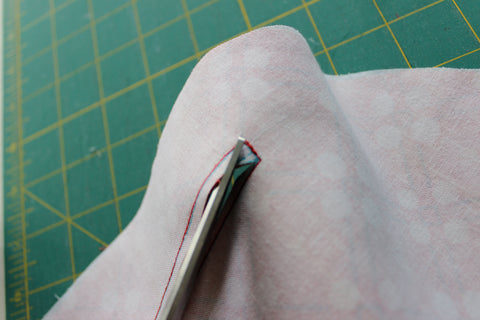
Take it to your pressing board and iron the lining towards to sewn box:

Then flip it through and press well so you have a nice neat box opening.

I then place my zipper wrong side up so the teeth are in the box and tape it in place (some people use a glue stick on this step but my girl always steals mine)
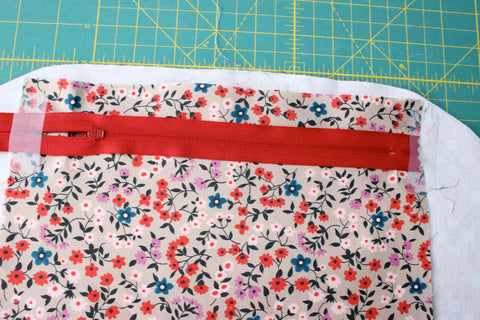
NOTE - my zipper is longer than 8", I'll just trim it off after I've sewn it up.
Head back to the machine and using your zipper foot, sew along the edge of the box, all the way around, catching the zipper tape underneath. Go slow, a shorter stitch length will help. I like to start at the "open" end, you may have to raise the presser foot up to move the zip head one way or the other, just make sure your needle is in the down position before you raise it.

you will have something that looks like this:

Now flip your lining over and place your second pocket piece on top OR if you have one pocket piece like I do, flip the bottom edge up so it matches the top edge. Pin or clip around.
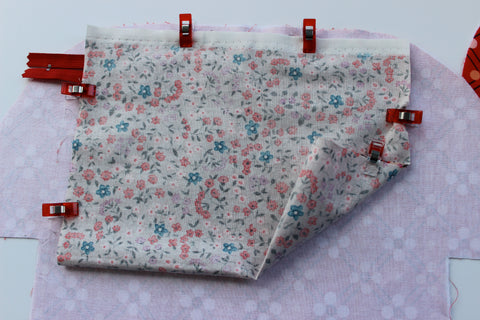
Keeping the Lining piece out of the way, we will now sew around the pocket. I like to sew around it twice, nothing worse than weak pockets!

Trim the edges - especially the top so we don't get it caught up in the zipper installation tomorrow!

Take a look at your gorgeous zip pocket!

Pockets are done!!!
Come back tomorrow for our GRAND FINALE!!! FINAL ASSEMBLY!!!
2 comments
wow, awesome article.Really looking forward to read more. Will read on… Georgopoulos
Love how you made your slip pockets! I will have to try this soon!