

Lotus Handbag Sew Along DAY 2
Welcome back!!! Now that we finished up most of our prep work on Day 1, today we will actually be doing a lot of sewing! Ready? Let's get started!
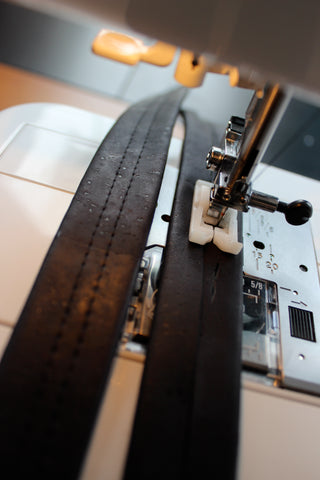
First thing we will tackle are the connectors, if you have chosen the smaller sew in connectors please follow Celine's directions in the pattern, if you are doing connectors like mine follow me. We are going to sew two lines down the middle of our connectors, these aren't really necessary but this way they will match the straps for a cleaner look. You are going to sew with the back seam facing upwards, down one side at approx 3/8" then down the other, this will both secure the strap seams and look great. Here's a photo of me sewing one side and the finished connector beside it flipped over.
Now we will work on our handles. First you will slide 2 O-rings onto each of your strips. Make sure the strip isn't twisted and match the right sides together at one of the ends, sew at 3/8", forming one big circle. (if you cut four strips for your handles, you will need to do this four times - two for each handle). Then finger press the seams open and topstitch the ends down:

Using your chalk/pen center line, you will now sew the edges to the center the same way you did for the connectors. If you prefer to use double sided sticky tape or to glue them first as we did with the connectors, feel free.

Now you will have a huge 1" wide circle in front of you with two O-rings on it. We want to sew the wrong sides together by folding the strap in two, matching the wrong sides and making sure there is an O-ring on either end. You can either put your seams right at the O-rings or off center them a bit:

Sew down one side of the handle, pivot as close as your foot allows you at the end, then back down the other side. Repeat for both handles.

Want to add some rivets???? Here's what you will need (plus a hammer)

I mark off where I want my rivets, then using the leather punch, punch some holes:

Insert the shaft of the rivet through the hole and place a cap on top.

Hammer the rivets in place and voila! Rivets!

You can skip the next steps if you are choosing sew in connectors!
Set your handles aside for just a minute and grab your connectors, cut your two 20" connectors in half so you now have four 10" connectors. Flip them wrong side up and place a seven inch strip of double sided sticky tape to them - make sure that the end that we trimmed is at the top:

Lay out your EXTERIOR A pieces and find the top and bottom centers, mark them with chalk/disappearing ink (test on a scrap of your fabric first!). Also mark 2.5" on either side of the center marks AND 8" up from the bottom - put this mark below the 2.5" marks, easier to explain in a photo than in words...

Remove the backing from the double sided sticky tape, slip a ring onto your connector, fold the top of the connector down 2" and place it onto your exterior piece. You will want the 2.5" mark to line up with the inside of the connector, and the top of your connector should line up with the 8" mark:

Repeat for the other side making sure that your handles are not twisted!!! Then you will sew up one side of the connector as far as you can, pivot, go across under the ring, pivot and back down again.

Because I'm using a Teflon foot, it's a bit longer and not as flexible as some smaller feet so I don't go too far up, instead I go as far as I can without my foot being all out of balance when turning to go back down the connector, then I do a separate set of stitches using my zipper foot to get closer to the O-rings. (you can also do this with the handles if you don't use the rivets)

Now we will secure the Peltex to the bottom piece, I know we've glued it, but it should still get at least one row of stitching on either long side, I'm doing three on each side because it looks nice.

Set your pretty bottom aside for now.
Now we will lay our EXTERIOR A piece flat on our table and lay our INTERIOR BAND B piece on top, matching the angle of the band piece with the top angle of our exterior piece:

Sew those together, then match the angle with the opposite side of the same exterior piece and sew together, press seams open:

It is a good time to mark the centers of top bands:

I'm going to skip a couple steps from the pattern (we will do them tomorrow)! Lets attach our bottom to our exterior now.
Grab your bottom piece and match up one long edge with the long edge of the bottom your exterior, pin or clip them together, and sew them at 3/8" seam allowance.

Then flip right side up and topstitch the seam allowances towards the bottom:

Repeat for both sides. Now is a good time to add your Handcrafted tag if you have one :)

Now set your exterior aside and tomorrow we will continue on!
2 comments
Hi Lisa! I’m actually using a Schmetz Universal 80/12, for my machine it is what works best. I just have to make sure it’s new and sharp when tackling cork or vinyl. As for the thread it’s 100w mettler brand. I’m in the process of switching to a heavier (70w) but I didn’t have access to it for the sew along. Every machine acts differently for different thread weights/brands and needles, it’s been a lot of trial and error for me to get the combo right, but this is what works for my domestic :)
What type of thread are you using and also what size needle? Looks great so far, really looking forward to completing this sew-along!